AACT Member-Only Content
You have to be an AACT member to access this content, but good news: anyone can join!
Chemistry Solutions
When I worked on my second master’s degree in science education, an elective I could take was Process Oriented Guided Inquiry Learning (POGIL). I had no idea what that meant or how it would be incorporated into a high school chemistry classroom, so I chose to take it because it was unknown to me. When POGIL was introduced in that elective class, it seemed like the activities were self-directed worksheets intended to develop concrete understanding. But I was unsure of how these could be integrated at the high school level, particularly in a chemistry class. Nevertheless, after many hours of study, I realized that the POGIL could be a viable option to aid in retention and student involvement.
Studies have shown that POGIL activities allow students to be activitely engaged and encourage the formulation of students’ own ideas (1), thus leading to a deeper understanding and better retention of information. However, just doing worksheets with guided questions, as it was presented in the elective I took, would not lead to the overall understanding that I wanted students to achieve after taking chemistry. Therefore, I contemplated how I could incorporate POGIL activities and also include an aspect of student involvement, because I knew that with only worksheets, students’ comprehension would not last over time. This task seemed overwhelming because of chemistry’s abstract nature. Nonetheless, it did not deter me from incorporating POGIL activities. I did some self-guided research before constructing and implementing POGIL-based lessons in my class. It took about two years from the introduction to the implementation of POGIL in my classroom because of the lack of student involvement I first perceived.
I realized that if I incorporated manipulatives to represent chemistry things, this would allow for increased student involvement and thus more understanding by them (2). However, being a high school teacher, and not having an unlimited budget to purchase fancy manipulatives or kits, I had to be creative. Thus, I have developed and implemented “High School Chemistry POGIL Activities on a Dollar Store Budget” in my high school chemistry classroom.
One POGIL activity that I have found very helpful for student understanding is called Electron Configuration. All that is required is paper, scissors, and an empty shoebox with a lid. The analogy of climbing a mountain is used to teach the concept.
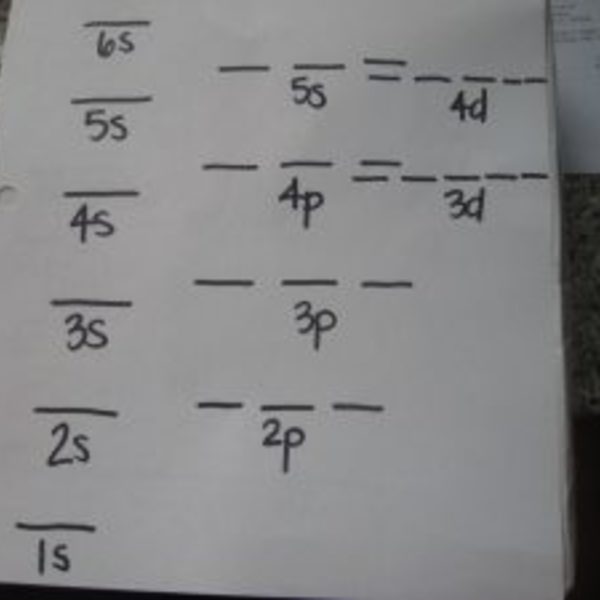 A propped-up empty shoebox serves as a mountain. On the empty shoebox is the Aufbau diagram, as seen in Figure 1, with slits cut on each line, which represent orbitals. Arrows are printed on paper and cut out. These arrows serve as “footprints.” I explain to students that only two footprints fit on each line, and they must point in opposite directions. Opposite footprints on a single line illustrate the Pauli Exclusion Principle. The atomic number indicates the number of footprints that a student can make, and I give students the appropriate amount of arrows to represent an element unknown to them
Students “climb the mountain” by placing footprints, keeping in mind that they should follow the easiest route possible up the mountain: 1s, 2s, 2p, 3s, etc. I remind them that taking the easiest route represents the Aufbau principle. In addition, to mimic Hund’s Rule, they should not take two steps in the same space, unless they have to, within a given sublevel. To personalize this analogy, before they start the activity I ask them to think about traveling on a school bus. I ask them what they do ensure they have a seat to themselves. I then let them know that electrons are no different—they each occupy a line by themselves within the same level before they pair up.
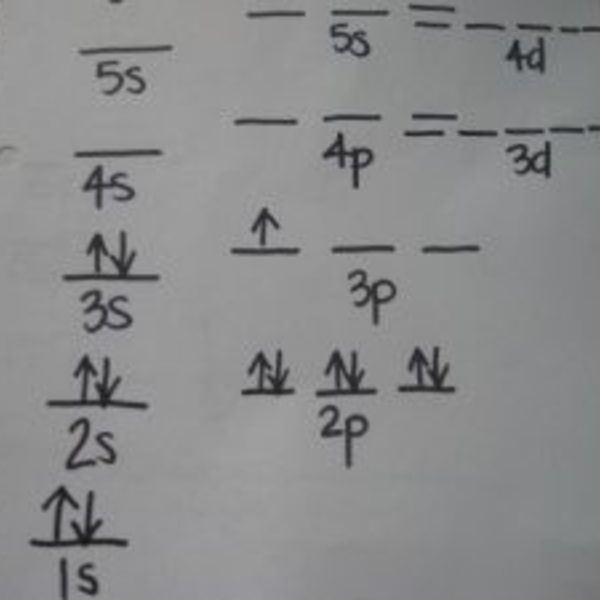 After placing the footprints, students describe to someone else how far up the mountain they got by reading to the other person not only the spots that they had filled but also how many footprints are in that spot. Because this is representative of electron configuration, students are reminded that sublevels should be grouped together; rather than 2p2 2p2 2p2, the lines combine, and it should be read as 2p6. From the number of footprints, students should be able to determine what element they have represented on their mountain. Figure 2 shows a picture of the mountain with footsteps for aluminum.
After practicing with a few elements, the class plays a variation of the game “Guess Who,” which involves describing people based on physical characteristics. Instead, the students describe elements. The class is divided into two teams on opposite sides of the room. I give each person a particular number of arrows, and they fill in their Aufbau diagram. One by one, each player chooses someone from the other team who hasn’t been chosen yet, and recites the electron configuration they’ve created with their mountain. The member of the opposing team determines what element is being described, and if they answer correctly, their team gets a point. If the answer is incorrect, the team providing the electron configuration gets the point. Halfway through the game, I give each person an element, and the game changes so the opposing team has to provide the electron configuration. The team at the end with the most points gets extra credit on the electron configuration quiz.
After the game, I have students label each row on their personal periodic table. Then, using aluminum as an example, I ask them how many arrows are in the s parts of the Aufbau diagram. When they answer two, I ask them if they see two columns grouped on the periodic table. When they locate the s block, I have them write an s above groups 1 and 2 on their periodic tables. I repeat this thought process with the p, d, and f shells, so their personal periodic tables eventually have the s, p, d, and f blocks labeled. Of course, to introduce the d and f blocks, a larger atom than aluminum must be chosen.
I have observed during the implementation of this activity that students enjoy learning the Aufbau diagram and writing electron configurations for any element. They also learn the Pauli Exclusion Principle and Hund’s Rule in ways that are memorable. Students can describe the order to which the orbitals are filled with electrons, thus leading to writing electron configurations. And with the help of the periodic table, students can write electron configurations and complete Aufbau diagrams of their own.
This activity also makes the introduction of noble gas notation, valence electrons, and Lewis dot structures much more palatable. Because of the understanding students have generated, they can simplify electron configurations into noble gas notations with relative ease. I give students an element, they write the electron configuration, and then I ask them to identify the previous noble gas on the periodic table. When looking at the noble gas, I ask them how many electrons that noble gas has and on the electron configuration I cross out the electron configuration that matches the noble gas. Then they write the noble gas in brackets and the remaining electron configuration. This activity precedes determining the number of valence electrons because they can visually observe the electrons now in the noble gas notation. Upon understanding the concept of valence electrons, they can then draw the Lewis dot structures, for which I have another POGIL activity.
- Moog, Richard S.; Creegan, Frank J.; Hanson, David M.; Spencer, James N.; Straumanis, Andrei R. “Process-Oriented Guided Inquiry Learning: POGIL and the POGIL Project.” Metropolitan Universities, v.17, n.4, 2006, pp 41–52.
- Howe, Ann C.; Durr, Beulah. “Using Concrete Materials and Peer Interaction to Enhance Learning in Chemistry.” Journal of Research in Science Teaching, v. 19, n. 3, pp 225–232 March 1982; DOI: 10.1002/tea.3660190305.