AACT Member-Only Content
You have to be an AACT member to access this content, but good news: anyone can join!
The Great Race: A Study of van der Waals Forces Mark as Favorite (10 Favorites)
LESSON PLAN in Intermolecular Forces, Polarity, Molecular Geometry, Chemistry of Color. Last updated May 14, 2019.
Summary
In this lesson students will investigate intermolecular attractive forces, van der Waals forces. They will construct models of specified molecules and use the models to identify the van der Waals forces that exist between molecules of each substance (London dispersion forces, dipole-dipole forces and hydrogen bonds). Then, using manometers, teams will perform a series of races to determine which substance has the stronger van der Waals forces.
Grade Level
High School
NGSS Alignment
This lesson will help prepare your students to meet the performance expectations in the following standards:
- HS-PS1-3: Plan and conduct an investigation to gather evidence to compare the structure of substances at the bulk scale to infer the strength of electrical forces between particles.
- HS-PS2-6: Communicate scientific and technical information about why the molecular-level structure is important in the functioning of designed materials.
- Scientific and Engineering Practices:
- Developing and Using Models
- Analyzing and Interpreting Data
Objectives
By the end of this lesson, students should be able to
- Identify the types and relative strengths of van der Waals forces existing between two identical molecules, given a structural formula.
- Rank molecules in order of increasing strength of van der Waals forces, given a set of structural formulas for several compounds.
- Manipulate models to demonstrate molecular orientations giving rise to London dispersion forces, dipole-dipole forces and hydrogen bonds.
Chemistry Topics
This lesson supports students’ understanding of
- Intermolecular Forces
- London Dispersion Forces
- Dipole-dipole Forces
- Hydrogen Bonding
- Molecular Geometry
- Molecular Structure
- Polarity
- Gases
- Gas Pressure
- Kinetic Molecular Theory
- Vapor pressure
Time
Teacher Preparation: 60-90 minutes (first time), then 15-30 minutes subsequently
Lesson:
- Engage: 10-15 minutes
- Explore: 60-90 minutes
- Explain: 20-30 minutes
- Elaborate: 20-30 minutes
- Evaluate: 20-30 minutes
Materials: Part A
Engage:
- Computer, internet access, and a projector
- 2 balloons
- 20 navy beans or chick peas
- 1 manometer with a two-hole stopper
Explore, Explain & Elaborate (per lab group):
- Table of Electronegativities
- Molecular model kit, wooden or Molymod
- 25 mL in dropper bottles of each of the following:
- Set 1: acetone, isopropanol
- Set 2: ethanol, 1-butanol
- Set 3: methanol & heptane
- Set 4: 1-butanol and pentane
- Set 5: pentane, hexanes
- Set 6: 1-butanol, tert-butanol (see teacher notes for specific details regarding Set 6)
- 1 test tube brush per
- 1 manometer per
- 1, 125 mL Erlenmeyer flask (or 250, or 500 mL Florence flask)
- 1 pair of manometer arms with rubber tubing connector (12 cm) at the bottom
- 1 one-hole #6 stopper (size stopper may vary depending on flask used)
- 1 small 90o glass elbow
- 1 , 8 cm piece of rubber tubing
- 1 water soluble marking pen or Sharpie
Set-Up:
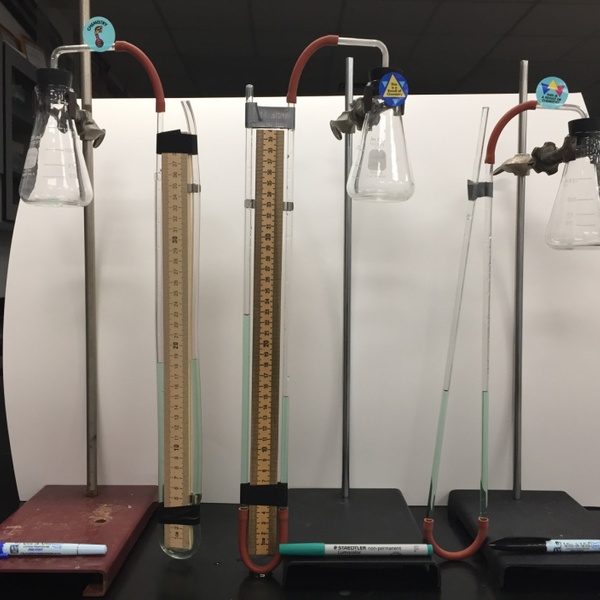
- The stickers on the manometers show the last connection. If the stopper is the last connection (dark blue sticker on the middle manometer), then the water levels will start out at very different levels. If the rubber tubing / 90o glass elbow is the last connection (turquoise stickers), then the water levels will start out at relatively equal levels. If you wish to obtain quantitative results, you can tape the manometer arms to a half meter stick or a 40 cm Charles Law measuring stick as shown on the left two manometers. The manometer arms on the right do not have a measuring stick between them.
Materials: Part B
- Microscopes
- 3x4 inch cards
- Pencil
- Pen
- Red, green, or blue Sharpie
- Wax paper rectangles cut 5 cm x 20 cm
- Dish detergent water in dropper bottles (5-10 mL detergent in 100 mL of water)
- Beral-Type pipets
Safety
- Always wear safety goggles when handling chemicals in the lab.
- Students should wash their hands thoroughly before leaving the lab.
- When students complete the lab, instruct them how to clean up their materials and dispose of any chemicals.
- All of these liquids are flammable and should be stored in a flammables cabinet. If one is not available, store them in a Flinn Saf-StorTM can or a metal paint can. Unused cans are available at paint stores.
- There should be no open flames in this lab – no burners, no matches, and no strikers. All liquids used in this lab are flammable.
- An operational fire extinguisher should be in the classroom.
- An operational hood should be used to discard remaining liquids. Note: Each lab pair will be using only ≈0.3 mL of each liquid. For several of the liquids, most of the liquid will evaporate before students try to pour the remaining liquid into the discard flask in the hood.
- Demonstrate and explain the proper way to insert glass tubing into a rubber stopper. Wet the tubing, hold the tubing at the elbow with a folded over paper towel, insert it with a gentle pushing, twisting motion.
- Resource for more chemical information
- Resource for disposal information
Teacher Notes
- Preparation: Before performing this lab for the first time, 60-90 minutes will be required to label dropper bottles with compound names and to prepare the manometer arms from glass tubing. After that the typical 15 -30 minutes will be required to set-up the lab for the students.
- This lesson could be done as a class demonstration but students will be less engaged. The “race” aspect of this lab provides an engaging competition aspect, especially for pairings where the outcome is uncertain to them.
- I recommend breaking the lab down as follows:
- Assign Quartets: 4 students comprise one X Quartet; 4 students comprise one Y Quartet. Hand out the Background and have students read the Background & Procedure for the Manometer potion the night before they start the lab. They should also make an effort to complete the Pre-Lab.
- Devote 40 – 45 minutes to quartets building the models, working together, completing table entries 1-4 and then, using the models, demonstrating to you exactly how /where each type of van der Waals force could hold two molecules of the substance together (see pictures below). At this time you can also check table entries 1-4. Check a different person’s paper for each liquid pairing. The first pairing will be the slowest as this is the students’ first experience attempting to do this.
- Devote 90 minutes to completing quartet specific Table 1-4 entries and performing the trials. After a quartet completes all three trials, have them work on entries 1-3 in the remaining three tables. They will get entry 5, the experimental results, from the other quartets. With 20 -30 minutes remaining, have students place their table entries 1-5 on the board or transparencies to share with the rest of the class. Discuss the results of each pairing as a class. Do the results make sense? What was learned about van der Waals forces from each trial? This process may require some time during another class period.
- Devote 45 minutes to completing discussions of the data from the pairings and to performing Part B: Practical Applications of van der Waals forces. Students should also work toward completing the lab reports.
- Material & Set-Up: For set 6, t-butanol freezes at 25oC. Therefore for Set 6 only, keep both the n-butanol and t-butanol dropper bottles in a shallow water bath at approximately 28-30oC. Place the t-butanol bottle in warmer water to melt it and then move it to the 28o-30o bath to keep it a liquid. Remember no open flames. Warm tap water will melt t-butanol. I melted a 100 mL bottle of t-butanol in my hand. Once melted, it may stay liquid for days at room temperature. However, insertion of a dropper into the liquid may cause it to re-freeze. The warm water bath is necessary. Two or three dropper bottles of each set of liquids will keep things moving.
- Store the bottles of the more volatile alkanes in a jar or can with a lid. Do not store the liquids in the dropper bottles for extended periods of time.
- It is helpful to have one manometer set-up for students to look at as a reference.
- Provided the student pairs work efficiently and simultaneously, the results will be unambiguous for the first two pairings listed for teams X & Y. The heptane/methanol and 1-butanol/t-butanol pairings may give mixed results. But that can lead to good discussions.
- If Florence flasks are used you will need to provide a Florence flask brush or curved metal rods that can be covered with a paper towel and be used to dry the flask thoroughly. Straight test tube / beaker brushes are ineffective for drying Florence flasks.
- Engage:
Part A: Manometer Races: Pass around a piece of Velcro. It was patented by George De Mestral in 1955 and commercially introduced in late 1950’s. Show the You Tube Video: “David Letterman in a Velcro Suit” - 1 minute is sufficient. The point is that although each Velcro hook/loop combination is a very weak attachment, collectively they are very impactful. You can relate this concept to van der Waals forces, especially London dispersion forces. Small molecules have just a few “hook/loop pairings” (a few proton/electron attractions) between them. Large molecules have many “hook/loop pairings” (many proton/electron interactions, hexane vs. pentane). Have them imagine how many “hook/loop pairings” would exist between polymers comprised of thousands of carbon and hydrogen atoms. Roughly spherical molecules have just a few pairings between them. Long or flat molecules have many pairings between them (tert-butanol (also called 2-methyl-2-propanol) vs. 1-butanol (also called n-butanol)). - This is a great lab for introducing/discussing kinetic molecular theory. Place 5 navy beans in one balloon and 15 beans in another. Have students palm the 5 bean balloon with both hands, shake it vigorously, get the sensation, and then pass it along. Follow the 5 bean balloon with the 15 bean balloon, have students repeat the shaking process, and note the difference in frequency of hits with their hands. Note the balloons may break. Unlikely but it does happen especially later in the day or the second day if you have staggered lab days. It is part of the excitement that is chemistry class! Have students wear safety glasses or goggles.
- Draw two manometers on the board. In the left manometer (before manometer) draw in water to the half-way point in each of the arms.
- Set up a manometer with a 2-hole stopper. (NOTE: The student manometers use 1-hole stoppers.) Half fill the arms with water. Colored water may make it more visible. Place a 45o or a 90o elbow in the second hole. Have students note the water levels in both arms. The gas arm is experiencing Patm as is the atmospheric arm. Therefore the water levels are equal. Ask students what they expect to happen & why, if you increase the number of gas molecules (relate this to the beans)inside the manometer. Gently blow into the elbow. You have increased the number of gas molecules, the gas concentration or density) inside the manometer, increasing the pressure (# of collisions of gas molecules with the water surface) in the gas arm causing the water level to decrease in the gas arm while increasing in the atmospheric arm. Draw in the water levels on the right manometer (after manometer) on the board. See the figure below.

- At this point students should have a working knowledge of how gases exert pressure and how a manometer works. They will need this knowledge to explain the results of the various trials.
- Engage:
Part B: Practical Application of van der Waals forces: Show the first 3 minutes of Liquid Spheres in Zero Gravity video. This can be used to demonstrate three things:- water is very cohesive
- water is strongly attracted to the metal loop (adhesion) relative to the air
- droplets of water will break away from the bulk of the water if they have sufficient kinetic energy. (Analogous to surface molecules breaking away, evaporating from a liquid if they acquire sufficient kinetic energy from random molecular collisions.)
- Astronaut Demonstrates How to wring out a Washcloth in Space (Buzz60 version is 1 minute, 15 seconds). This also shows the cohesive nature of water and can be used to introduce surface energy. The water is clearly attracted by the washcloth material and the astronaut’s skin. Another option is to show Liquid Ping Pong in Space to discuss attractive properties.
- These videos will help students understand the concept of surface energy and the attraction that water has for substrates – cloth, skin and metals.
- Explore, Explain & Elaborate: The Background section on the student handout introduces students to the various types of van der Waals forces but does not delineate their relative strength or the factors that influence their relative strength. The lab reagent pairings should help students determine what these factors are. Their textbook can also serve as a reference if they are struggling. The Background and Procedure should be assigned prior to the lab.
- Students should have a working knowledge of molecular shapes – tetrahedral geometry about sp3 hybridized carbon atoms, trigonal pyramidal about sp2 hybridized carbon atoms and bent around oxygen atoms. They need not be familiar with organics. The molecular models or 2-D cards will allow them to visualize and draw these molecules. The column headings in the data tables should also give them insights into the connectivity and structure.
- Students should also have a working knowledge of bond and molecular polarity. For bonds, an electronegativity difference of 0.40 or less is considered nonpolar.
- Decide how you wish to have students perform the experiment trials. The instructions are designed for each student quartet comprised of Teams (pairs), X and Y Teams, to perform 3 trials. But quartets can perform two or even only 1 trial if it is necessary to save time. It is better to have more teams doing each trial in case the only team doing a trial obtains poor data. Fewer trials performed by each lab pair, will result in the lab requiring less class time to complete, using less of each reagent, and generating less waste. However, note that Trial #3 utilizes only alkanes, students performing only Trial 3 will not have the opportunity to demonstrate dipole-dipole forces or hydrogen-bonds to you with the models. Similarly, students that do not do Trial 3 will not have models that display only London dispersion forces.
- When the students use the models to demonstrate proper orientation of the molecules for London dispersion forces, dipole-dipole forces and hydrogen-bonding, many misunderstandings are cleared up. It has been my experience that until they do this, although they may be able to provide the definition of a hydrogen-bond, they have no idea what it actually means. The opportunity to force them to think about the definition in a small group under your direction while visualizing the hydrogen-bond using the models is priceless. See the pictures below.
- Look for students to very specifically orient the models to demonstrate that the compound in question shows only one or two or all three types of van der Waals forces. Also emphasize that hydrogen bonds are simply a special class of dipole-dipole forces.

|

|
| Dipole-dipole force: Acetone | London dispersion forces: Acetone |

|

|
| Dipole-dipole force: Isopropanol | London dispersion forces: Isopropanol |

|
|
| Hydrogen bonding: Isopropanol |
- n-butanol paper model examples:

|

|

|
| London dispersion forces | Hydrogen bonding | Hydrogen bonding and dipole-dipole forces |
- You can ask student lab quartets (2 pairs) bring their models to you, orient them appropriately to demonstrate each type of van der Waals force occurring between the molecules of the substances they are using, and explain the nature of the force and the orientation selected.
- For acetone, have students demonstrate dipole-dipole forces and London dispersion forces. For ethanol, methanol, isopropanol and butanol, have students demonstrate dipole-dipole forces, London dispersion forces, and hydrogen-bonding. For the alkanes have students demonstrate with both the “linear” versions and more twisted versions. Alkanes are like worms in a bowl, constantly colliding and constantly changing shape. For n-butanol and t-butanol have students note the relative amounts of contact area between the “Linear” n-butanol molecules vs. the “Spherical” t-butanol molecules. Card drawings may facilitate this better than the ball & stick models. Space fillings models would be ideal for this comparison.
- During the lab set-up, note that the stopper is the critical connection or at least the connection most likely to be done poorly resulting in undetected leakage leading to poor results. You cannot overemphasize the necessity of holding the flask firmly on the bottom with one hand while pushing forcefully & twisting the stopper into the flask. Keep a watchful eye on the results of the races and suggest quartets redo trials when necessary. Hopefully they will also have some idea that something went wrong when they consider the results of each race.
- For reference, the equilibrium vapor pressures of the liquids are:
|
1-Butanol: 7 mmHg |
t-Butanol: 40.7 mmHg |
Isopropanol: 45.4 mmHg |
|
Heptane: 46 mmHg |
Ethanol: 59.3 mmHg |
Methanol: 127 mmHg |
|
Hexane: 153 mmHg |
Acetone: 231 mmHg |
Pentane: 514 mmHg |
- Evaluate: You will evaluate throughout the lab as students bring their models to you and explain how the various attractive forces form.
- Keep an eye on the results students are getting in the races. The pairings will provide good results only if the lab pair teams are working quickly and simultaneously and firmly insert the stopper.
- I like to display the results on the board after all quartets have completed all three assigned pairings. You can provide time for quartets to complete Data Table entries for the pairings they did not perform.
- Student lab reports will serve as the formal evaluation.
- For the first internet search, purpose of four nail enamel ingredients, this is a useful site.
- The lab report is for both X and Y students. Everyone should reflect on and see the results for all six pairings in Part A. The X Quartet and Y Quartet procedures are listed separately to avoid confusion among students as to which liquid pairings they are to perform. Before students actually start using the manometers, make certain that they understand how they work.
For the Student
Download all documents for this lesson, including the teacher guide, from the "Downloads box" at the top of the page.