Chemistry Solutions
March 2025 | Tech Tips
Using Conditional Formatting in Spreadsheets to Create Engaging, Interactive Lessons with Instant Feedback
By Sean Regan
Instructional Strategies, Classroom Activities, Technology Integration
In the 2020–21 school year — a time most of us teachers may want to forget — educators were tasked with reinventing how they taught and how students learned via remote or hybrid learning. One morning, I was stressin’ for a lesson and, looking around online for ideas, I decided to pay $3 for an activity on determining whether chemical equations were balanced or not (thanks, The Science Kidd!). And while I haven’t spent any more money on these lessons since then, I was incredibly inspired and motivated by the potential of my $3 investment.
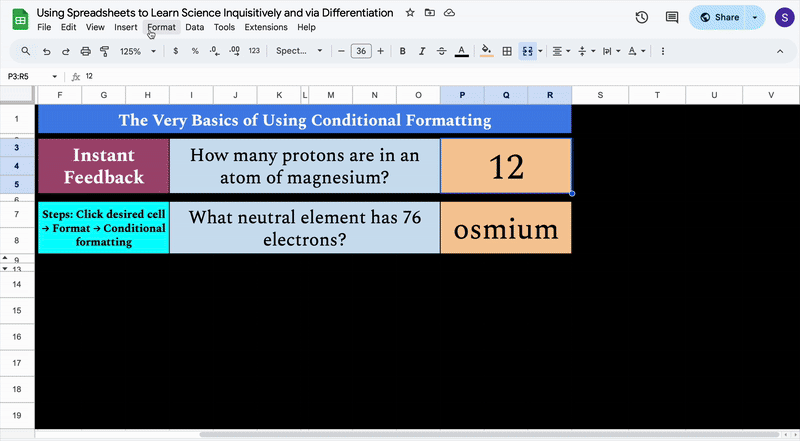
The original lesson I purchased was based in Google Sheets and used a spreadsheet with conditional formatting to give students instant feedback about whether their answers were correct or not. Using this type of spreadsheet, if you input a correct answer, a cell or group of cells instantly changes to a bright color. But if you input an incorrect answer, the lack of a color change lets you know immediately.
When I used this activity in my own classroom, I saw enjoyment in my students’ faces as the cells changed colors, validating their responses instantly. I also observed the impact on students when an answer they thought was correct was actually incorrect. At the same time, this activity also resonated with students who were learning remotely at home, giving them instant feedback even when I wasn’t right there with them.
With some prior knowledge about using conditional formatting (and additional research I did online), I have since spent countless hours working to make chemistry easier to understand and more engaging for the students in my classes, as well as other students at my school, and hopefully more students elsewhere.
My goals with this article are to showcase to other teachers this successful method of exploring introductory chemistry, invite you to engage in some lessons with your students, and give you a chance to try making similar teaching tools of your own … or to adapt mine for your own teaching!
Exploration as a method of learning
At first, my goal for these assignments was for students to practice and build confidence in such skills as balancing equations, writing ionic formulas, performing pH calculations, and other problems that had specific answers. These skills are essential for students to learn in order to succeed in understanding chemistry. But knowing how to do chemistry processes or calculations is not solely what helps a chemistry student succeed. Students also need to know how to analyze data, extract information from patterns, interpret and manipulate models, think critically, and more.
Initially I worked at building lessons focused only on specific concepts/skills. But eventually, I started adding to the lessons to include baseline information that the students would explore and interpret in order to begin learning about the concepts themselves, either individually or in groups working at large screens at my lab benches. In either case, I challenged them to:
- inquisitively look at images or data to analyze and discover periodic trends;
- dissect particle diagrams for limiting and excess reactants;
- determine the difference between concepts such as accuracy and precision; and
- look at patterns of numbers to learn the rules of significant figures, among more examples.
These lessons helped students build science and engineering practices, expound disciplinary core ideas, and explore crosscutting concepts, in accordance with the Next Generation Science Standards.
Once students analyze different examples (on their own or in groups), they can make notes of their findings in the lesson, and then try examples. By receiving immediate feedback in Google Sheets (or delayed feedback to encourage deeper thinking), students gain insight into whether they are learning chemistry or not, and hopefully, the confidence they need to keep moving ahead, and even help their neighbors who may be struggling. A primary benefit of this method is that it frees the teacher to better assist those students most in need of help understanding a concept, as opposed to spending time simply verifying if student answers are correct or not.
Evolving my teaching style
Even though I think I am an engaging teacher, in the years since remote learning, I have personally experienced that students are much less attentive to lecture-style learning than ever before. Because of this, I’ve built and embraced these spreadsheet-based lessons to encourage interactivity for students. One result of this change is that I now rarely have them copy notes that my students won’t remember or ever look back at. Instead, I engage them by asking them to respond to prompts each step of the way as they work to understand concepts.
How do I engage them? The vast majority of my students are driven to achieve 100% completion and 100% correctness in each lesson. Along the top of each lesson spreadsheet, two cells track the students’ progress. One cell tracks the percentage of the document the student has completed, and the other tracks the percentage of the questions answered correctly. Because of the innate desire of most of my students to hit the 100% mark in both categories, I’ve tried to instill a sense of “gamification” to the process of learning chemistry.
Being able to use the spreadsheet to track their own progress in real time is not only encouraging for the students, but also very beneficial for me as the teacher. I can easily see how far along each student is in a lesson, and make decisions on who might benefit the most from my assistance. So I can easily focus my attention on a student who has only completed 45% of the work (but has only 35% correct) rather than spend my time with students who are performing at close to 100%. But knowing which students in a large class are struggling the most or performing the best requires tracking each screen around the room at all times.
This level of insight wasn’t initially possible for me, so I built a gradebook spreadsheet that tracks the progress of all students simultaneously and instantaneously. This allows me to see the progress of all my students at a glance, and then decide whom to assist accordingly. A true game-changer!

 |
| Figure 4. The author’s gradebook spreadsheet is updated based on the live results from students completing each activity. It provides the teacher with a clear visual overview of student performance over multiple lessons. |
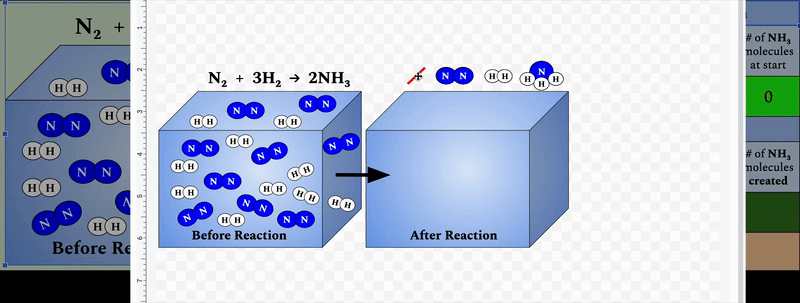
When I was a high school chemistry student, I always knew that “the answer was in the back of the book.” But sometimes I didn’t actually know how to get from step 1 to step 2, let alone step 6 or 10. Figure 5 shows how I use another spreadsheet to give students interactivity points at each step of the way in solving an empirical formula problem (I apply a similar logic to many other multi-step problems, such as stoichiometry or gas laws calculations). Some students may have the confidence to guide themselves through the steps, while others benefit from following me as I demonstrate a couple of examples. I’ve found that a majority of my students prefer learning at their own pace, rather than trying to match the pace of my instruction.
These lessons are my effort to make students feel confident with the material from the start, before they push themselves with harder examples and no guidance. The majority of concepts I cover using this method translate easily for use during labs or other assessments without further practice. I do, however, encourage students to practice additional examples on paper to make the transition from doing set-up problems in Sheets to applying their problem-solving skills to make their own setups on paper (such as for stoichiometry or gas laws calculations). And, to later reinforce and practice the ideas presented in these lessons, I provide students with duplicate versions (see the description of Step 6, at the bottom of Figure 5, that involves empirical formulas), allowing them to practice again or review further before an assessment. The ability for students to easily reference the material and gain/regain confidence when needed is terrific.
 |
|
Figure 5. An example of a spreadsheet showing part of an empirical formula lesson. |
Differentiated learning and targeted feedback
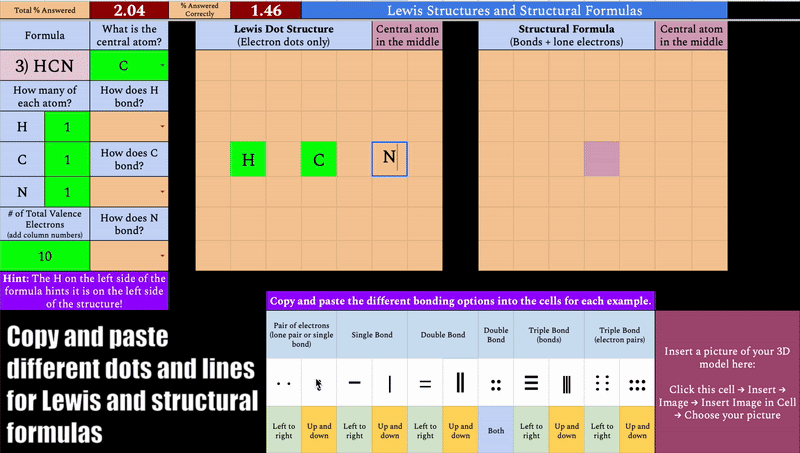
Different types of questions can be asked in these lessons, such as simple multiple choice (this can lead to some guessing), fill-in-the-value, solving calculations using Sheets functions, and open-ended questions. I use different colored cells to correspond to different types of questions: light orange cells change instantly when correct, dark green cells require all questions in a set to be correct before changing color, and light pink cells won’t change colors at all (I usually use these cells for rubric grading in labs). I use the dark green cells to engage students who may just guess various answers until they get to the correct one, as well as to challenge students in general. These questions force students to think critically, and prompt genuine discourse when used in groups, especially when their answers don’t make the group of cells change color.
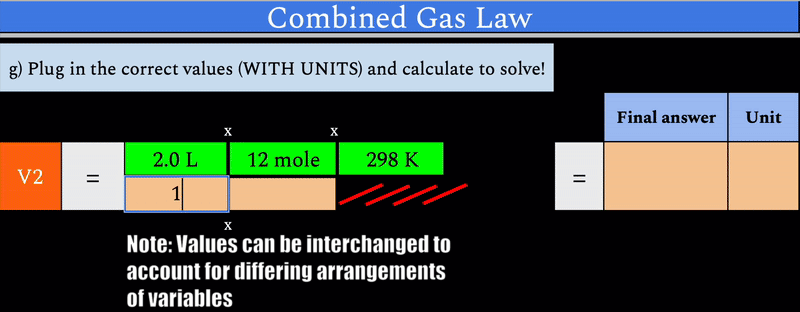
Figure 6. The author’s spreadsheet tool provides instant feedback through conditional formatting, as a student completes a multistep combined gas law calculation. |
Using these interactive spreadsheets, students not only learn about chemistry, but also get valuable lessons in how to use spreadsheets. Processes such as editing a spreadsheet, performing calculations, solving multiple problems quickly with autofill, and creating tables and graphs (see Figure 7) are spreadsheet skills learned in my class.
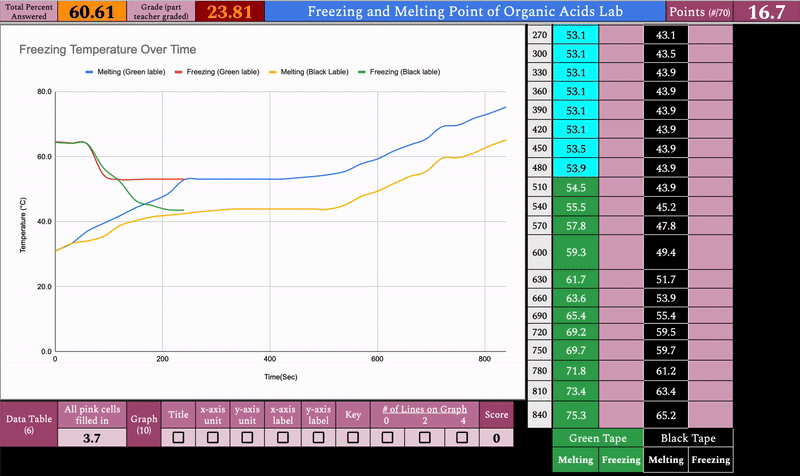
Figure 7. An example of how students create a graph from data. This spreadsheet is designed with an integrated rubric, making it easy for teachers to grade. |
Another way I differentiate using these types of activities is by providing “hints” or guidance for students when I’m not nearby to help. Specific cells can be checked on or off by students to reveal a hint (if the student wants one) and other cells are coded to give automatic hints based on predicted misconceptions (as shown in Figure 8). For example, if a student misreads the number of carbon atoms in a complicated compound, a hint pops up encouraging them to look back again closely at the formula. This targeted feedback based on predicted misconceptions is a huge benefit for students as they learn different topics throughout the year.
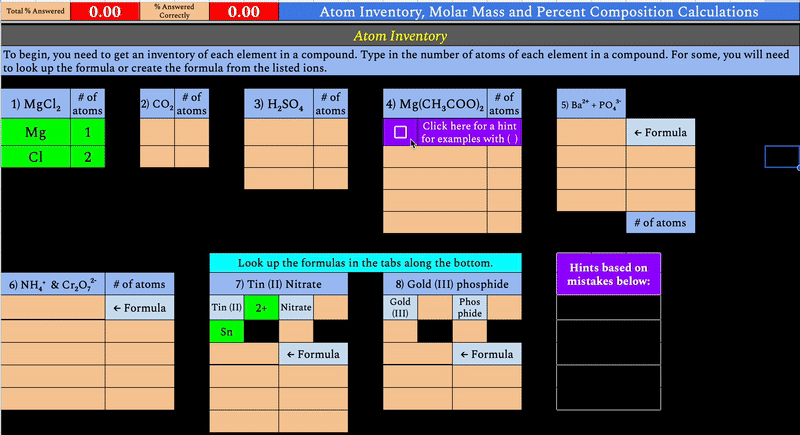
These hints provide students with quick tips, allowing them to continue on while I may be busy helping another student, so that they don’t have to stop and wait to ask for help. Because of this targeted feedback, these lessons can also be used in a flipped-classroom approach, allowing students to have baseline knowledge coming into a class, so that they can use class time for more engaging explorations, such as more in-depth lab experiments, experimental design, or discussions.
Reflections
The feedback I’ve seen when using this method has been very positive, including when I did an anonymous survey of 137 chemistry students in my College Prep and Advanced College Prep classes over the past year. When asked, “If you had to give a rating out of 10 to your experience with Google Sheets chemistry lessons, what would your rating be?”, students gave an average rating of 8.53/10.
In addition, a teacher to whom I showcased these ideas at a conference last fall wrote, “The spreadsheet lessons have been an amazing tool in my classes thus far. From the perspective of a fairly new teacher, these sheets have been an enormous help in terms of planning. They’ve been a huge hit with my students with many of them preferring their homework or classwork assignments being based in the Sheets. It took a bit of persuasion at first, but all of my students loved it after trying it. From a special education perspective, these sheets have also been a boon. I have been able to easily modify them to differentiate for students with different learning abilities and support requirements. I can see these being an integral teaching tool in my classes in the years to come.”
While the lessons may not be a fit for every single student (or teacher), this positive feedback has encouraged me to keep making lessons in this format, as I am seeing first- and secondhand evidence of the overall positive experience of these lessons, and the strong results that follow.
The ability to create lessons at my own pace and skill (as opposed to waiting for a company to update their software) was, and remains, a large reason for me creating these lessons. My lessons can also be used by teachers with little to no knowledge of spreadsheets. Of course, my phrasing, sequence, and method of presentation may differ from yours. However, with some additional knowledge about how to manipulate Google Sheets, teachers can create their own lessons in this vein, or edit lessons that already exist. If you are interested in learning more about these lessons and how to start editing/making your own, I invite you to join me for a live AACT webinar next month, on Thursday, April 10 at 7 PM EST! I also present professional development on these methods at local and national conferences.
I hope you see the potential in this teaching method and want to give teaching chemistry by spreadsheet a try! If you are interested in trying a lesson for yourself, explore this lesson for teaching Limiting and Excess Reactants and/or this lesson about Precision, Accuracy, and Significant Figures. Please find me on LinkedIn if you’d like to try out any more of my lessons, or provide feedback.
Many thanks to my family for their support, and to my chemistry teaching colleagues for trying out these lessons with their students over the last few years. I’m also very thankful to my students for being my beta testers, and everyone else at FHS and beyond for allowing and encouraging me to run with this idea!