AACT Member-Only Content
You have to be an AACT member to access this content, but good news: anyone can join!
Chemistry Solutions
Although hydrocarbons are, for now, abundantly available for use in industry, nature has not always produced enough of them of the right molecular size and structure. So chemists and chemical engineers strive to rectify the problem by manipulating carbon chains. One such process is breaking down the over-abundant rarely used viscous high-boiling-point fractions into more desirable and useful free-flowing low-boiling-point hydrocarbons. The process is called cracking. Heating the oils without air present works (sometimes called pyrolysis), but thermal cracking requires high temperatures. The process can be run at low temperatures and pressures when done with catalysts, commonly aluminates and silicates (1).
The chemistry
There is a strong case for organic chemistry to be the first chemistry that students experience. Many textbooks start with chemical and physical changes, structure of the atom, bonding, compounds and mixtures, or the periodic table. These can be quite difficult concepts to appreciate. Organic chemistry is visually appealing and can be quickly put into the context of students’ everyday lives through topics such as fuels and plastics.
Ball-and-stick models are seen almost every day in advertisements on television, and to the general public, they represent chemistry.
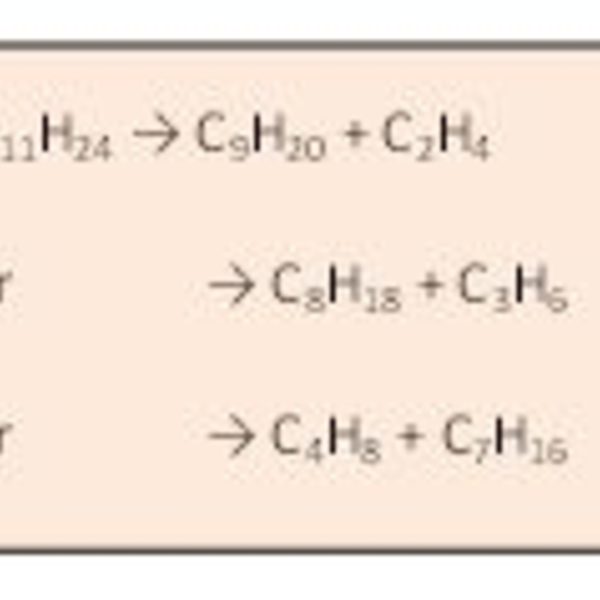
Figure 1 shows an example of cracking reactions, and you do not have to know much about chemistry to see that the connections between the atoms are breaking (cracking) and reforming. Students can make their own diagrams similar to Figure 1, and there are countless variations. Students may generate their own rules for bonding and ask, “Why do you always give carbon four sticks or bonds?”

Figure 1
In terms of chemical equations, dreaded by many new chemistry students, these can be portrayed as in Figure 2.
Chemists like clean reactions to give a desired product. Chemical engineers, however, look for a product whose purpose is to serve the community, provide jobs, and provide a profit for the company making the product. And it does not have to be a pure chemical.
The traditional school demonstration
In the U.K., we have long used an apparatus such as Figure 3, but there are safety concerns. Teachers and technicians have reported to the Consortium of Local Education Authorities for the Provision of Science Equipment (CLEAPSS) (2) that the apparatus “explodes.”

Figure 3
Teachers who are trained chemists recognize the problems and correct them, but those who are not trained can be scared of the experiment and may not perform it. In the 1960s, this method was designed as a student-performed experiment, but in those days most teachers of chemistry had degrees and training in chemistry. Now this demonstration is carried out less often because it raises safety concerns (3). CLEAPSS has a video of the reaction.
How does this demonstration go wrong?
- The most common issue is that after the gas has been collected and the Bunsen burner switched off, attention by the teacher moves to the collected gases. In the meantime, the equipment cools down and the gas pressure in the reaction tube reduces. Air pressure pushes the cold water up the delivery tube and into the still-hot reaction tube, and thermal shock causes the test tube to break. Insertion of a Bunsen valve (4) could help, but it is not always reliable.
- The other method of avoiding so-called “suckback” is to immediately lift the apparatus out of the water bath. However, this step can be forgotten when teaching because you are focused on students.
- A further solution is to introduce another test tube between the reaction tube and water collection. This has the chemical advantage of collecting cracked liquid fractions, but the demonstration takes longer to perform. The equipment is cumbersome, time-consuming to set up, and confusing to students watching.
- Many teachers use soda glass tubes rather than borosilicate glass. Our view at CLEAPSS is that no glassware heated by a Bunsen burner should be soda glass; it readily suffers heat shock, so borosilicate glass with a 6- or 7-mm outer diameter should always be used (5). In the experiment, if the tube is heated in one position only, the glass softens and becomes molten or shatters. You must hold the Bunsen burner and move it up and down the tube to avoid direct heat.
- The clamp could be incorrectly fixed in the central position of the test tube. Clamps are often made of a low-melting-point alloy. To prevent melting, the clamp needs to be close to the open end of the test tube.
- The reaction needs to be very hot to work: so hot that the rubber stopper may melt, and if the glass tubing does not protrude through the stopper, the rubber softens and covers the hole. The test tube expands on melting with the production of gas and bursts open, and the gas under pressure catches fire.
- The gas produced has an awful smell, so the room needs to be well ventilated. The gas is not toxic, but it is flammable. Not enough is formed for an explosion in the room. CLEAPSS has noted that with the onset of energy-efficient rooms, ventilation can be a problem.
As you can imagine, many teachers thought this procedure too dangerous and called for this experiment to be banned (the easy option). This comment is always challenged by CLEAPSS—there must be a safer alternative procedure.
A microscale version
View the full lesson in the Classroom Resources library.

Figure 4
Gee, isn’t this cute?" -Overheard at ChemEd 2013
Using the microscale setup, shown in Figure 4, eliminates the possibility of an explosion and other safety hazards, but there are safety precautions to take. A spirit burner replaces the Bunsen burner and a Pasteur pipet replaces a test tube for the reaction. We received reports of fires in labs caused by spirit burners being knocked over. As a result, some suppliers stopped carrying the small burners for schools and relied upon “aromatherapy bottles.” These held too much flammable liquid and the tops were not secure, so any upset of the burning spirit burner caused a fire. However, CLEAPSS managed to make a spirit burner out of a small 25-mL jam-jar with a string wick, and the flame is hot enough to cause catalytic cracking. The fuel used is either a methylated spirit or ethanol. Under careful supervision, this method is safe for students, but could also be done as a teacher-run demonstration. Here is a video of how to prepare and execute the experiment.
This microscale version takes about 15 minutes to advance the reaction, and that allows time for the teacher to engage with students. Rooms with powerful air conditioning can cause the flame of the burner to flicker, which may stop the reaction. To avoid this, you can carry out the reaction in a quiet corner or in a nonworking fume hood. Also, the use of a web-cam allows the teacher to project the experiment onto a screen.
There are a number of “green issues” to discuss with students when doing this reaction, such as using catalysts to reduce operating temperatures, using fossil fuels, using plastics, or reducing emissions of hydrocarbons to the atmosphere.
Testing for “cracked” gas
The common test for carbon–carbon double bonds is the addition of bromine water, which changes from yellow to colorless. The color change is rather slow, and I find a permanganate test more indicative that something has happened. So when I do this demo, I start with the permanganate test. Using dilute 0.002-M test solutions means the tests are over quickly, allowing more time to discuss with the class about what is happening in the experiment.
Here are some notes to take when preparing and storing both solutions.
Bromine water
- Pure liquid bromine is corrosive and toxic. It’s best to handle it in a fume hood wearing rubber or nitrile gloves and goggles. Any person new to handling Br2 should receive instruction from an experienced colleague. Using very dilute 0.002-M bromine (6) is suitable for this reaction. Storing liquid bromine is difficult because as it is used infrequently, the liquid evaporates and produces a toxic vapor, which causes the cap to disintegrate and metals to corrode. CLEAPSS gets reports from schools that have unopened 100-mL bottles that have been stored for three years and still contain 80–90 mL of the liquid.

A dibromide and a bromohydrin
- In the reaction with an alkene, Br2 adds across the double bond. Not only does a dibromide form, so does a bromohydrin. Although 0.002-M Br2 is a pale yellow, a color change is detectable with this small concentration in the presence of the cracked product.
In a little you can see a lot" -Overheard at BCCE 2014
Permanganate solution
- In the test for the presence of double carbon–carbon bonds, 0.002-M permanganate can be used. When you bubble the gas through, the solution turns brown and eventually colorless. The double bond is oxidized and forms a diol. The equation is not easy to work out but can be represented as

- For the more advanced students, there is another reaction with permanganate that can be carried out. Adding anhydrous sodium carbonate makes the permanganate solution alkaline, and on addition of the cracked gas, the solution turns green (manganate(VI)) and finally brown, but it does not go colorless.
- Potassium permanganate is not stable when dissolved in water. It is not even completely stable in dilute sulfuric acid (usually 1 M), in which it can be prepared. As you pour from a bottle that the solution has been kept in for a few months, brown manganese (IV) oxide can be seen on the sides of the bottle. I have even seen bottles of a colorless solution with a brown solid on the bottom of the bottle! It is normal to prepare potassium permanganate solution in 1-M sulfuric acid.
It is easy to add too much of the test solutions to the test tube. When you add the liquid to the test tube, gas is displaced. The more solution you add, the more gas gets displaced and the less likely it is for the solution to react to completion. It is also difficult to ensure mixing between the gas and liquid phases. Do not be tempted to put your thumb on the open end and shake the tube. This often results in the liquid spraying out; the test tube should be agitated and with only a few drops of the solution in the test tube. This is quite safe.
Finally, one can set fire to the cracked gas and observe the intense yellow and often smoky flame. The open end of a test tube is placed in a Bunsen flame, and the gas catches fire.
Notes & Acknowledgements
I would like to thank my colleague Dr. Kay Stephenson for ideas and for resurrecting this experiment from the depths of my knowledge; Steve Jones, the director at CLEAPSS, who has championed the microscale approach and encouraged me to persevere with it, despite comments that it is not real chemistry (but that is another story); and Mary Owen, CLEAPSS senior technician, who continually makes it work better.
- For further reading, click here.
-
CLEAPSS is the U.K. advisory service for teachers and technicians in schools and colleges teaching students to 18. It is subscribed to by the majority of employers of teachers and technicians to provide safety advice and information. It also advises senior managers, science institutions such as the Royal Society for Chemistry, the government department responsible for education, and has a close working relationship with the U.K. Health and Safety Executive.
- In the U.K., if senior managers require teachers to teach outside their discipline, they need to fund extra Continual Professional Development to these teachers. However, many senior managers in the U.K. do not recognize this as an issue. In U.K. law, the onus of safety is on the employer and a valid defense by an accused teacher in a safety incident would be that the employer did not provide suitable training. The Royal Chemistry Society recognizes this issue and offers courses and training to science teachers who do not have chemistry as their specialist subject.
- A Bunsen valve is a small piece of thick rubber pressure tubing with a slit cut into the rubber and a piece of glass tubing at the end. Gas is allowed out of the slit, but if the pressure in the apparatus drops below atmospheric, then the slit closes up.
- This tubing is heated with a good Bunsen burner on a hot flame and bends without kinks. The glass is then cooled slowly to anneal it by changing the flame to the luminous flame and holding the tubing in the flame for a couple of minutes before letting it cool. No bend should be more than a right angle. There will be no more collapsed and weak bends. (CLEAPSS also runs workshops in these techniques.)
- To prepare 0.002-M Br2, dissolve 0.48 g of potassium bromide in 8 mL of water, add 1.4 mL of 10% (available chlorine) sodium hypochlorite (CORROSIVE) and 1 mL of 2-M hydrochloric acid. Dilute to 1,000 mL with water.